Add Luxul AP to Network
This is for Luxul AP’s that are not connected to a Luxul Controller:
- First, you will need a Laptop with an Ethernet Connection
- Second, unplug the AP from the Router, however, continue to use the POE (Power Over Ethernet) to keep powering the AP.
- Third, change your IP address on your Laptop to something in the range of the AP, but not the same address as the AP. (192.168.0.5)
- Follow the instructions below to change your Laptops IP Address:
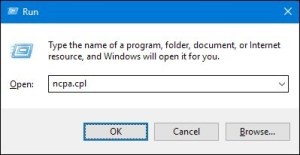
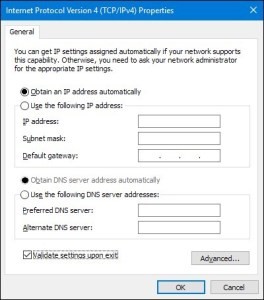
To change the Laptops IP address in Windows, you’ll need to open the “Network Connections” window. Hit Windows+R, type “ncpa.cpl” into the Run box, and then hit Enter.

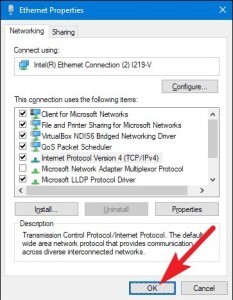
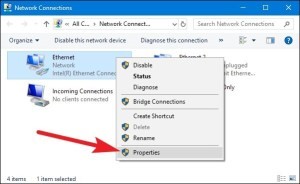
In the “Network Connections” window, right-click the adapter for which you want to set a static IP address, and then select the “Properties” command.

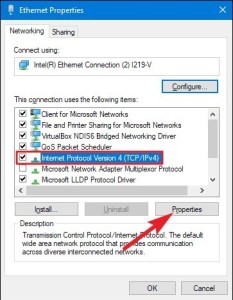
In the properties window for the adapter, select “Internet Protocol Version 4 (TCP/IPv4)” and then click the “Properties” button.

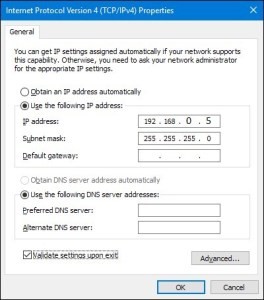
Select the “Use the following IP address” option, and then type in the IP Address and Subnet Mask, that will be used to connect directly to your AP.
IP:
- 192.168.0.5
Sub Mask:
- 255.255.255.0
Keep everything else blank.
When you’re ready, click the “OK” button.
And then close out of the network adapter’s properties window.

- Fourth, turn off your Wi-Fi on your Laptop.
- Fifth, plug the AP directly into your laptop and wait (1) minute.
- Sixth, open a web browser and type in 192.168.0.10.
- Seventh, the login screen should appear and this is where you will enter the login information:
- User: admin
- Password: admin
Configurations of the Access Point:
Configure everything you need before setting the Static IP Address.
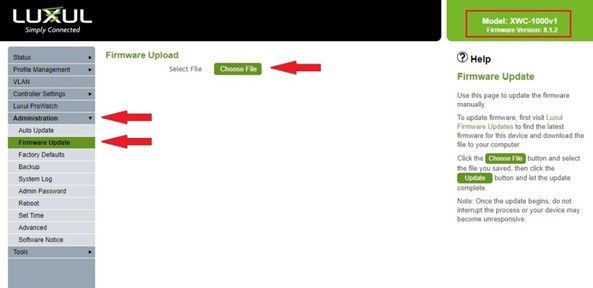
- First, check the Firmware and update it before doing anything.
- Check what the current Firmware Version is on your device. It should be at the top right of the window while logged into the Luxul AP. *in the red rectangle*
-
- Click on this link to search if there is a newer firmware version available to download: Legrand/Luxul/Firmware
- If there is a newer version, download it to your desktop, then go to the Administration tab on your Luxul AP to upload that file from Firmware Update, then Select File.
- The AP will grade, once the upgrade has been completed, the AP will reboot. Once rebooted, you will need to re-login to the AP.
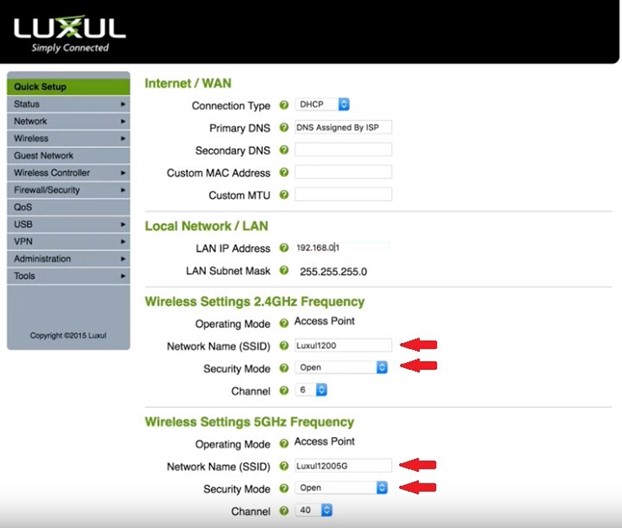
- Second, setup your Wi-Fi Names and Passwords.
- For example, change your 2.4GHz Network Name (SSID) to MyHome and your 5GHz to MyHome5G to differentiate the (2) network qualities you have to connect to.
- Don’t use your name or last name. Also, don’t name it the name of a fish if you have boats in your driveway… Outside people will quickly figure out it’s your network 😉
- Set your Security Mode to WPA2 and create Your Password for Your Wi-Fi. Both 2.4GHz and 5GHz. *save it in a safe place*
- For example, change your 2.4GHz Network Name (SSID) to MyHome and your 5GHz to MyHome5G to differentiate the (2) network qualities you have to connect to.
- Third, change the Administration Password from the default: admin under the Administration tab.
- Fourth, in Administration tab, change the Time Zone to your time zone.
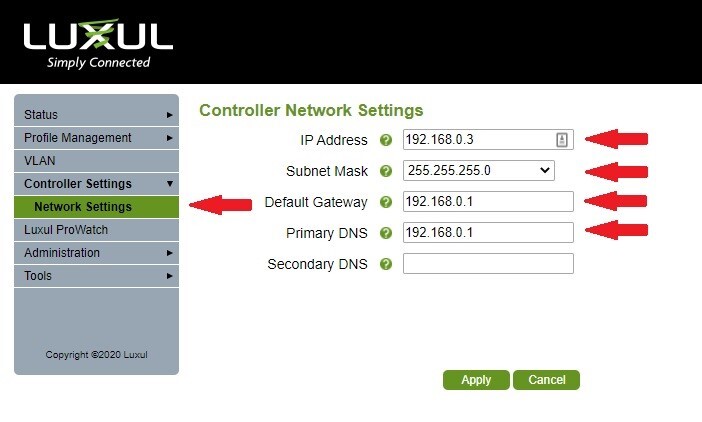
- Fifth, change the IP address in Network Settings from DHCP to a Static IP Address. *Reason for this is to be able to quickly login to your AP using the static IP address instead of looking for it on your network to change passwords or perform firmware upgrades*
- If the IP address of your router is 192.168.0.1, I would recommend setting the Static IP Address on your AP to 192.168.0.3… Why not 192.168.0.2? Because in the future, you will be getting a Luxul Wireless Controller to manage your APs. This is recommended if you have more than (1) AP.
- The IP Address would be: 192.168.0.3
- The Subnet Mask would be: 255.255.255.0
- The Gateway would be: 192.168.0.1 *which is the routers IP address*
- The Primary DNS would be either: 192.168.0.1 or Googles DNS: 8.8.8.8 *example*
- The Secondary DNS would be: Blank or Googles DNS: 8.8.4.4
- What is a DNS? The Domain Name System (DNS) runs in the background, converting human-readable website names into computer-readable numerical IP addresses. DNS does this by looking up that information on a system of linked DNS servers across the internet. However, different DNS servers can behave differently in terms of speed and security.
-
- Once that is set, you will want to click Apply. Then the AP will ask to be Rebooted to have the changes take effect.
- Sixth, wait about 2 minutes and then unplug the Ethernet Cable from your Laptop and plug in into the Router.
- Seven, turn your Wi-Fi back on and connect to your Wi-Fi that you have just created.
At this point, you will need to set your Ethernet connection back to DHCP on your Laptop.
To change the Laptops IP address in Windows back to DHCP, you’ll need to open the “Network Connections” window. Hit Windows+R, type “ncpa.cpl” into the Run box, and then hit Enter.
In the “Network Connections” window, right-click the adapter for which you want to set a static IP address, and then select the “Properties” command.
In the properties window for the adapter, select “Internet Protocol Version 4 (TCP/IPv4)” and then click the “Properties” button.
Click on “Obtain an IP address automatically” in both fields.
When you’re ready, click the “OK” button.
And then close out of the network adapter’s properties window.